
Ubuntu Installation Guide
Nov 11th 2020
Introduction:
Linux has been increasingly gaining popularity among the average computer users. Lots of gaming services such as Steam and proprietary software such as AutoDesk are being ported to Linux. Linux offers the users complete freedom in customization, organization and utilization of the operating system and computer. Many shy away from Linux citing it is too complicated or hard to get around for an average user. But the days of mastering the terminal to simply use Linux are giving way to simple user interface such as software stores and simple point and click updates. There are many Linux distributions and each of them have their own unique pros and cons. One of the most popular distributions is Ubuntu. It is well known for its stable releases and overall strong trust factor in the tech field. Today I will be showing you a simple guide on how to install Ubuntu on your machine.
Setup:
Let’s start off by navigating to Ubuntu’s download page, here. This will initiate an automatic download of Ubuntu 18.04 disc image (.iso file). While we wait for the download, make sure you have a USB stick by your side. Recommended minimum space capacity is 2GB. Back up any files on the USB as we are going to format it. Download this software from PendriveLinux. Once both files have been downloaded connect your USB and open up PendriveLinux software.
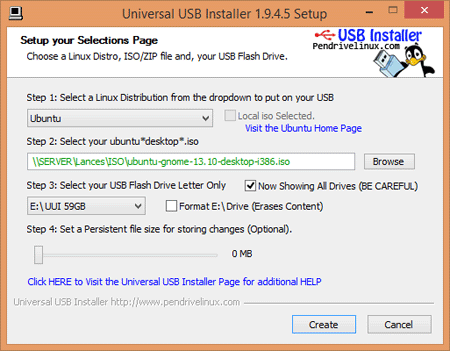
Select the following options for each step as shown in the screen shot above:
Step 1: Select Ubuntu as your Linux distribution choice.
Step 2: Find your download Ubuntu 18.04.iso file. (PendriveLinux can automatically download Linux distros for you)
Step 3: Select the drive to which your USB stick is connected. Check “Format”.
Step 4: Skip this step.
Press create! Now sit back and wait for the process to complete. Once it is done, you will have your Ubuntu image ready to be booted into using your USB stick.
Booting:
Now its time to boot into Ubuntu. Keep the USB plugged in. Restart your computer and depending on your default BIOS settings the following three scenarios might occur:
1- Screen turns purple and you are automatically booted into Ubuntu.
2- GRUB menu shows up and asks you to select boot options. Choose the first one “Ubuntu 18.04”.
3- You boot back into Windows as normal. You will need to go into BIOS during start up and choose your USB as boot disk option. For more info refer here.
Installation:
Once you make it into Ubuntu, start the installation and follow the basic setup. Fill in your information and such. Once you hit the partition page:
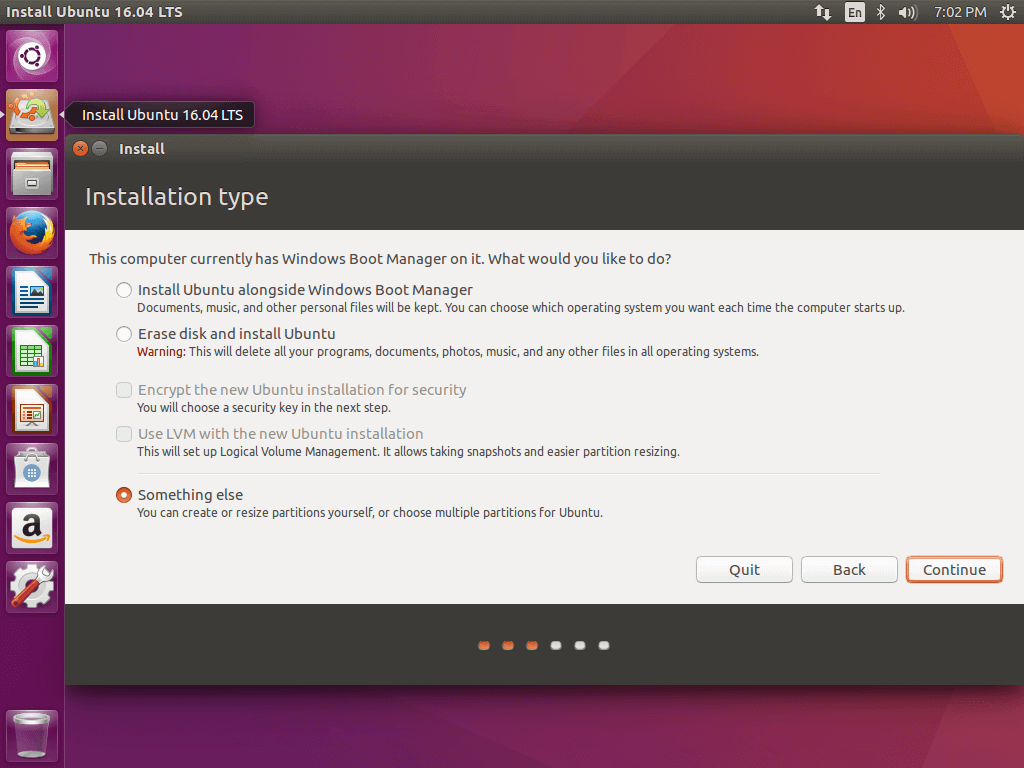
Depending on what you want to do. For example, the first option is to install Ubuntu along side Windows. That is called dual boot. The second option will delete your copy of Windows and all your files stored on the hard disk and install Ubuntu over them. Once you have decided, accept all default setting and press “Install Now”. Now sit back and wait for the process to complete. It can take anywhere between twenty minutes to one hour.
Conclusion:
After the installation is done, your computer will restart and you will need to unplug your USB to properly boot into your fresh new copy of Ubuntu. Check out AskUbuntu for any kind of question or problem solving guides.